I have obtained the Error with code: 80073712 yesterday while installing Service Pack 1 of Windows 7. I have no idea what was causing the problem, I have fixed it by installing the following update:
http://support.microsoft.com/kb/947821
After installation of this pack, SP1 installed without problems.
Also I have run the System File Checker, which found some errors, repaired them, but also found some errors which he could not repair. So I don't know if it contributed to the fix of the problem.
http://www.microsoft.com/resources/documentation/windows/xp/all/proddocs/en-us/system_file_checker.mspx?mfr=true
sobota 26. února 2011
středa 23. února 2011
Spring MVC simple project (Spring by example)
This semester I had to do a bigger project using Spring Framework & Hibernate. On a side of this project I had a smaller one which I have created just to always try out certain parts which later I applied to the bigger one. Here I just present the simple project which should be easy to understand, but it contains all the important parts/frameworks/design patterns of enterprise applications: MVC, ORM, Validations, Security, Internalization, Views/ Tiles, Unit Tests.
I do not have much experience working with J2EE, or writing enterprise Java applications, so this will maybe help someone who is on the same Java level as I am.
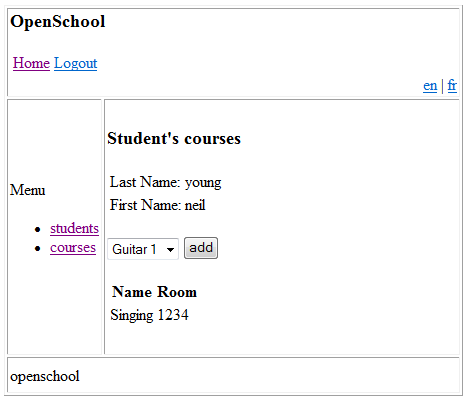
Now this is the resulting application:

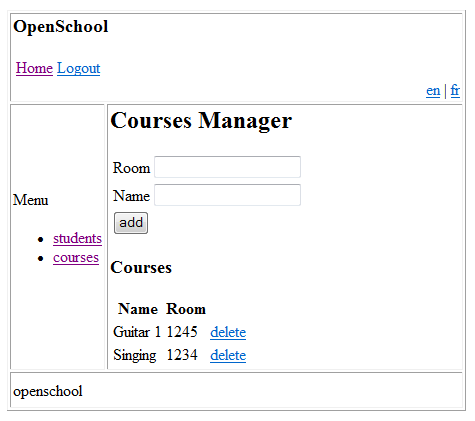
Basic setup of the project
This is Eclipse "Dynamic Web Application" Project. I have used the latest Eclipse 3.6, Java 1.6 and Tomcat 6. However this should not limit to run the project with different configurations, however changing to Java 1.5 would require some additional changes (@Override annotations).In the following image you can see the two groups first the source files and second all the important configuration files. Here is brief overview:

- web.xml - Web Deployment Descriptor, the base of the configuration for all the parts that compose the web application.
- tiles.xml - Configuration of Appache Tiles - templating framework, used to define reutilisable parts of web pages.
- spring-servlet.xml - Spring configuration part. Described lower.
- jdbc.properties - This file just holds the properties of the database connection.
- applicationContext-security.xml - Configuration of Spring Security Framework.
Package and project structure
The project has a common structure:View <--> Controller <--> Service <--> Repository <--> DB.
The Repository pattern (implemented by the classes in the DAO package) allows the abstraction of the DB technology. The Service layer has implemented all the functions of the project. For example in the StudetsService class you can find all methods concerning the students (add a course to student, create new student..).
The Controller layer uses the Service layer to fill the model needed behind the view and to perform the tasks desired by the user.
Model View Controller with Spring
The MVC software architecture permits separate the domain model (M), the logic (C) and the user interface (V). Spring implementation of MVC is based on DispatcherServlet. DispatcherServlet is classical HttpServlet which decides to which Controller the current request should be sent and which View should be used to render the reponse.Please refer to the Oficial Documentation which contains great explanation.
In the web.xml the DispatcherServlet is defined to handle all the requests coming to the web site (see url-pattern).
<servlet>
   <servlet-name>spring</servlet-name>
   <servlet-class>org.springframework.web.servlet.DispatcherServlet</servlet-class>
   <load-on-startup>1</load-on-startup>
  </servlet>
  <servlet-mapping>
   <servlet-name>spring</servlet-name>
   <url-pattern>/</url-pattern>
  </servlet-mapping>

  <context-param>
  <param-name>contextConfigLocation</param-name><param-value>/WEB-INF/spring-servlet.xml
   /WEB-INF/applicationContext-security.xml
  </param-value></context-param>

  <listener>
    <listener-class>org.springframework.web.context.ContextLoaderListener</listener-class>
  </listener>
In the servlet mapping part, the servlet-name is set to "spring". This servlet needs some special configuration and this will be provided by spring-servlet.xml file. But in order to tell Spring where to search te configuration we set the path of this file as the parametr to the Spring ContextLoader. There is also a link to the file which provides security configuration. Spring-servlet.xml contains a lot of configuration. Lets now take a look at the part concerning the view.
Apache Tiles
With spring you can use several APIs or technologies to build you user interface: standard JSP, Java Server Faces, Apache Tiles (they do not compete, they serve for different purposes and sometimes overlap). In this project I am using Apacha Tiles. That is a framework which allowes you to define a fragments or parts which can be reused in several web pages (typically for example you have a menu bar, which is always present).In the Spring-servlet.xml this is the part concerning Tiles:
<bean class="org.springframework.web.servlet.view.UrlBasedViewResolver" id="viewResolver">
     <property name="viewClass">
         <value>
             org.springframework.web.servlet.view.tiles2.TilesView
         </value>
     </property>
 </bean>
 <bean class="org.springframework.web.servlet.view.tiles2.TilesConfigurer" id="tilesConfigurer">
     <property name="definitions">
         <list>
             <value>/WEB-INF/tiles.xml</value>
         </list>
     </property>
 </bean>
That tells Spring, that all the views should be resolved using TilesView class and the configuration can be found in the tiles.xml file.
Tiles Configuration
First declared in the Tiles configuration file is the layout. So a specific page(layout.jsp) which defines the layout of our pages and links to jsp pages which represent these parts. After this definition come the declarations of each view. Each view specifies which layout it uses and the parts which should be imported.
<tiles-definitions>
    <definition name="base.definition" template="/WEB-INF/jsp/layout.jsp">
        <put-attribute name="title" value="">
        <put-attribute name="header" value="/WEB-INF/jsp/header.jsp">
        <put-attribute name="menu" value="/WEB-INF/jsp/menu.jsp">
        <put-attribute name="body" value="">
        <put-attribute name="footer" value="/WEB-INF/jsp/footer.jsp">
    </put-attribute></put-attribute></put-attribute></put-attribute></put-attribute></definition>

    <definition extends="base.definition" name="students">
        <put-attribute name="title" value="Users management">
        <put-attribute name="body" value="/WEB-INF/jsp/students.jsp">
    </put-attribute></put-attribute></definition>
</tiles-definitions>
Take a look at the layout.jsp file and you will fast understand how it works.
MVC implementation
To understand how MVC works open one of the Controller classes, for example: StudentsController
@Controller
public class StudentsController {

 @Autowired
 private StudentsService studentsService;

 @RequestMapping("/students")
 public String listUsers(ModelMap model){
  model.addAttribute("student",new Student());
  List<student> users = studentsService.listStudents();
  model.addAttribute("studentsList",users);
  return "students";
 }

  @RequestMapping(value = "/addstudent", method = RequestMethod.POST)
    public String addContact(@ModelAttribute("student")
    Student user, BindingResult result) {

   studentsService.addStudent(user);
        return "redirect:/students";
    }

    @RequestMapping("/delete/{studentID}")
    public String deleteContact(@PathVariable("studentID")
    Integer studentID) {
     studentsService.removeStudent(studentID);
        return "redirect:/students";
    }
}
There is a private field of type StudentsService. You can see that it is annotated with @Autowired. This service provides all the methods needed to manipulate students. The @Autowire annotation tells Spring, that it should automatically instantiate this field from it's Dependency Injection container (in other words you do not have to take care about the creation of object).Next there are 3 methods with different signatures all of them annotated with @RequestMapping. The MVC framework binds the URL given in the decoration with the controller and with the execution of the decorated method. In other words when the user navigates to "..TestingProject/students.do" this method will be processed to construct the Model and to return the View to the user.
As said before the methods have different signatures depending on their neeeds but the are some rules which have to be kept. (see the documentation).
The most straightforward is the method listStudents. This method fills the given Model (which is passed to the method by MVC framework) and returns the name of the view which should be used to show this model. You can take a look at the Tiles configuration to see which JSP will be shown after returning "students" as the name of the view.
Object Relational Mapping - the Domain
In the Domain package you can find just two classes: Student and Course. This is the Student class:
@Entity
@Table(name="student")
public class Student {

 @Id
 @GeneratedValue
 private Integer id;

 @ManyToMany
 @JoinTable(name="student_course"
  ,joinColumns=@JoinColumn(name="student_id")
  ,inverseJoinColumns=@JoinColumn(name="course_id"))
 private List follows;

 @Column
 private String firstname;

 @Column
 private String lastname;

 @Column
 private String email;

 @Column
 private Integer phone;
 public Integer getId() {
  return id;
 }
  ...getters and setters...
}
The @Entity annotation tells hibernate that this class represents and entity which should be stored in the database, the @Table annotation details the name of the table used to store these entities.Each field of this class is annotated with @Column annotation - this tells Hibernate that each field should be persisted as separated column.
The @Id and @GeneratedValue annotations over the id field specify that this field represents the primary key and that the value of this key should be automatically generated whenever persisting a new entity in the table.
And last @ManyToMany and @JointTable annotations represent the N to N relationship between students and Courses. In common words Student can have several Courses and a Course can have several students.
The @JoinTable annotation specifies exactly which table should represents the N - N relation ship and declare the foreign keys in this table. Note that there are different ways to manage this using Hibernate (look for @ManyToMany and @MappedBy annotations).
The course class is quite similar and I will not describe it here.
Internalization / Localization
It is quite common demand to make the application supporting multipel languages. Spring framework provides LocalChangeInterceptor, which based on parametr in the url of the page decides, which languages version of the page should be loaded. To configure this feature take a look at the spring-servlet.xml file which contains the 3 following beans:
<!-- Messages and Internalization -->
    <bean id="messageSource"
        class="org.springframework.context.support.ReloadableResourceBundleMessageSource">
        <property name="basename" value="classpath:messages" />
        <property name="defaultEncoding" value="UTF-8" />
    </bean>

    <bean id="localeChangeInterceptor"
     class="org.springframework.web.servlet.i18n.LocaleChangeInterceptor">
        <property name="paramName" value="lang"/>
    </bean>

    <bean id="localeResolver"
   class="org.springframework.web.servlet.i18n.CookieLocaleResolver">
   <property name="defaultLocale" value="en"/>
    </bean>
The first bean defines the store for the strings in multiple languages. Here it aims at all files which look like "messages*" placed in the classpath, defining the UTF-8 as the default encoding to save the strings.The second bean is the above mention language interceptor. The paramName property tells spring to look at the "lang" url parameter before composing the final web page.
The last bean defines which implementation of LocalResolver interface should be used to define the language. Here it is CookieLocalResolver. An implementation which uses a cookie sent to the user, which later can be retrieved to determine the language.
Now in the resources you can localize two files: messages_en.properties and messages_fr.properties. These two files contain a simple list of key-value pairs defining the strings used in the application and the translations.
Now the last step is to take a look in how these strings are references in the web pages. For that take a look for example at menu.jsp which defines the left side menu of the application.
<%@taglib uri="http://www.springframework.org/tags" prefix="spring"%>
<p><spring:message code="label.menu"/></p><ul><li><a href="/TestingProject/students"><spring:message code="label.students"/></a></li>
<li><a href="/TestingProject/courses"><spring:message code="label.courses"/></a></li>
</ul>
Here you can see that instead of writing the string inside of the A tag, the spring:message tag is used which loads the correct string identified by the "label.students" key.
Security
Now the security is taken care of by Spring Security (former Acegi Security) framework and I use the very basic settings. Spring Security in its core uses basic Filter and FilterChain interfaces which are defined in the core of Java Servlet application and are generally code parts responsible for composing or caching the content to be send to the user.In the web.xml file the following parts instruct the application to use the org.springframework.web.filter.DelegatingFilterProxy class for filtering all url (pattern set in the filter-mapping part). This filter is later responsible for allowing access to certain parts only to users with certain rights. To get more information refer to this official "The Security Filter Chain" page.. For more information about filters in general visit this page..
The first part of the security settings is defined in separated applicationContext-security.xml file.
First the following authentication-manager tells spring that the user is authentified against the database. The same data source is already used for ORM mapping.
<authentication-manager>
  <authentication-provider>
    <jdbc-user-service data-source-ref="dataSource"/>
  </authentication-provider>
</authentication-manager>
However the precedent snippet does not define how the security data is stored in the database. That is because it uses the default implementation. In other words Spring expects you to provide the data source with default structure. This structure is composed of two tables: users and authorities. To see the details take a look at the Apendix A of Spring documentation. And if you just want to have the DB structure you can create it with security_db.sql script which is part of the project:
create table users(
      username varchar(50) not null primary key,
      password varchar(50) not null,
      enabled boolean not null);

  create table authorities (
      username varchar(50) not null,
      authority varchar(50) not null,
      constraint fk_authorities_users foreign key(username) references users(username));
      create unique index ix_auth_username on authorities (username,authority);
So we have the users which have roles and the data is stored in the database. Now the way it is used is specified in the second part of "applicationContext-security.xml".
<http auto-config="true">
        <intercept-url pattern="/admin/*.do" access="ROLE_ADMIN"/>
        <intercept-url pattern="/**" access="ROLE_USER,ROLE_ADMIN,ROLE_TEACHER"/>
        <intercept-url pattern="/login.jsp*" filters="none"/>
        <form-login login-page='/login.jsp'/>
</http>
Here we assign to url patterns the roles that users need to have in order to access these urls.Well that's it. But this is just a very simple way of implementing security. There are more advanced manners of securing the method calls or visibility of html elements always based on user roles.
Hints for the other aspects enterprise application
Unfortunately I did not have time to include in this simple project some other aspects of enterprise applications.Validations
To implement data validations spring contains org.springframework.validation space, which contains a Validator interface containing "validate" method. Here is a short example of how validator could be implemented for a "User" class:
public class UserValidator implements Validator {

 @Override
 public boolean supports(Class arg0) {
  return User.class.isAssignableFrom(arg0);
 }

 @Override
 public void validate(Object arg0, Errors arg1) {
  User user = (User) arg0;
  if(!isValidEmailAddress(user.getAdresse_mail())){
   arg1.rejectValue("adresse_mail","adresse_mail.notValid","Not a valid email");
  }

 }

 public boolean isValidEmailAddress(String emailAddress){
     String  expression="^[\\w\\-]([\\.\\w])+[\\w]+@([\\w\\-]+\\.)+[A-Z]{2,4}$";
     CharSequence inputStr = emailAddress;
     Pattern pattern = Pattern.compile(expression,Pattern.CASE_INSENSITIVE);
     Matcher matcher = pattern.matcher(inputStr);
     return matcher.matches();
   }
}
In this example I am using Regular Expressions to determine whether the specified email is in valid form.Another way of validating would be to use the JSR 303 validation specification, which defines the validation model based on annotations. This allows you to annotate field of you domain class and thus specify the way this field should look like. In the following example the @Email annotation would take care of what the above implementation does.
public class User {

@Email
protected String adresse_mail;

@Basic
@Column(length=50)
public String getAdresse_mail() {
 return adresse_mail;
}
public void setAdresse_mail(String adresse_mail) {
 this.adresse_mail = adresse_mail;
}
}
However there are cases where you will always like to implement your own validators. For example when you want to reach to the database and decided whether there is not already a user with a given name, or whether the student is not already signed in specified class.To get more information about JSR 303 validation refer to this blog post.
Advanced Security Approaches
When working on our application I was having hard time to find out how to force Spring Security to you my own database model and perform the authentication my way. I found that the easiest way was to implement UserDetailsService interface. This interface contains one method called: loadUserByUsername which returns UserDetails class, also defined by Spring. This class should contain the user information. So basically its up to you to implement this method that way, that you will give it the user name and it will return filled UserDetails class containing users password and users roles. Here is a simple implementation:
@Service("userDetailsService")
public class UserDetailsServiceImpl implements UserDetailsService {

  @Autowired
  private UsersDAO usersDAO;

  @Transactional(readOnly = true)
  public UserDetails loadUserByUsername(String username)
      throws UsernameNotFoundException, DataAccessException {

    User user = usersDAO.findByLogin(username);

    if (user == null)
      throw new UsernameNotFoundException("user not found");

    Collection authorities = new ArrayList();
    for (openschool.domain.model.Role role : user.getRoles()) {
      authorities.add(new GrantedAuthorityImpl(role.getRole()));
    }

    String password = user.getPassword();
    boolean enabled = user.isEnabled();
    boolean accountNonExpired = true;
    boolean credentialsNonExpired = true;
    boolean accountNonLocked = true;


    org.springframework.security.core.userdetails.User springUser;
    springUser = new User(username, password, enabled, accountNonExpired, credentialsNonExpired, accountNonLocked, authorities);

    return springUser;
  }
}
Unit Tests
When using Spring IOC you need to tell to spring what is the application context for the unit tests. Normally the application context is specified by the web.xml file. But the Unit Tests do not have anything together with the web application, so you have to tell to Spring where to find all the definitions in order to wire all you injected objects.This can be done by annotating the UnitTest class by following annotations:
@RunWith(SpringJUnit4ClassRunner.class)
@ContextConfiguration(locations={"classpath:/applicationContext.xml"})
The ContextConfiguration annotations provides the information to spring where to find the configuration xml. Here it points to the applicationContext.xml on the classpath. Just two provide some information on how the complete test class can look:
@RunWith(SpringJUnit4ClassRunner.class)
@ContextConfiguration(locations={"classpath:/applicationContext.xml"})
public class UsersDAOTest{

 @Autowired
 UsersDAO usersDao;

 private Long beforeUserID;

 @Before
 @Transactional
 public void initDB(){
  Administratif user = new Administratif();
  user.setLastName("User_before");
  user.setAdresse_mail("email@email.com");
  user.setLogin("login");


  usersDao.addUser(user);
  beforeUserID = user.getIdUser();
 }

 @Test
 @Transactional
 public void testAddUser() {

  User user = new User();
  user.setLastName("Lastname");
  user.setAdresse_mail("email@email.com");

  usersDao.addUser(user);

  User user2 = usersDao.getUser(user.getIdUser());
  assertEquals(user, user2);
       }
You might also want to create Test Suites which allow to run multiple tests in the same time, by creating simple class with @Suite annotation:
@RunWith(Suite.class)
@Suite.SuiteClasses({
 MyTest1.class,
 UsersDAOTest.class,
 MyTest2.class
})
public class TestSuite {
  //intentionally empty
}
NumberFormatInfo ReadOnly
I was running traditional MS Visual Studio 2008 Unit Tests and the test of the following method was always failing. On the first look I did not why but from the fact that when I placed the breakpoint on the return line it never got hit, I figured out that there must have been exception before.
As this was running in the Unit Test, the exception was not thrown but just shown in the Error Message column in the Test Results table.
public String GetBalance(String globalBalance){
  NumberFormatInfo formatInfo = NumberFormatInfo.InvariantInfo;
  formatInfo.CurrencySymbol = "$";
  return globalBalance.ToString("C", formatInfo);
}
I obtained the following Error Message:
System.InvalidOperationException: Instance is read-only..Ok now it was clear. I was trying to change the InvariantFormat which surely was not allowed. The right way of doing things would be:
Since I was looking at the Stack Trace, I decided just to look a bit deeper:
at System.Globalization.NumberFormatInfo.VerifyWritable()
   at System.Globalization.NumberFormatInfo.set_CurrencySymbol(String value)
   at
Lets take a look at the source code of the NumberFormatInfo class and search for the CurrencySymbol property, for example at this site>
public String CurrencySymbol {
  get { return currencySymbol; }
  set {
    VerifyWritable();
    if (value == null) {
      throw new ArgumentNullException("CurrencySymbol",
      Environment.GetResourceString("ArgumentNull_String"));
    }
    currencySymbol = value;
  }
}

internal bool isReadOnly=false;

private void VerifyWritable() {
  if (isReadOnly) {
    throw new
InvalidOperationException(Environment.GetResourceString("InvalidOperation_ReadOnly"));
  }
}

public static NumberFormatInfo ReadOnly(NumberFormatInfo nfi) {
  if (nfi == null) {
    throw new ArgumentNullException("nfi");
  }
  if (nfi.IsReadOnly) {
    return (nfi);
  }
  NumberFormatInfo info = (NumberFormatInfo)(nfi.MemberwiseClone());
  info.isReadOnly = true;
  return info;
}
Ok so any time the property is set (any of the properties of NumberInfoFormat) the VerifyWritable method is called. And this method just checks the private field isReadOnly. This makes sence. This property is set up by the ReadOnly static method. So any time you will need a read only instance of NumberFormatInfo you can just call:
NumberFormatInfo myReadOnlyInstance = NumberFormatInfo.ReadOnly(formatInfo);
sobota 19. února 2011
Silverlight Accordion - Changing the Header Style
Changing the header style for all items in the Siverlight Toolkit's Accordion item is not that easy as you might think it would be. If you wish to change the Container for each Accordion Item, you can just change the ItemContainerStyle property, however this will not help you to change the header. You can also apply some changes directly to the Header property of each Item that you add to the accordion.
<layoutToolkit:Accordion>
    <layoutToolkit:Accordion.ItemContainerStyle>
           <style TargetType="layoutToolkit:AccordionItem">
               <setter Property="BorderBrush" Value="Black"/>
               <setter Property="BorderThickness" Value="1"/>
               <setter Property="Background" Value="DarkRed"/>
           </Style>
    </layoutToolkit:Accordion.ItemContainerStyle>
</laoutToolkit:Accordion>
But the problem here is that the Border component never stretches across the whole header and besides you would have to add this to each Item (or change the Item Template).
Changing the AccordionButtonStyle
The solution here is to override the AccordionButtonStyle Property of the Accordion. To have some base you can get the style which is presented in the Silverlight Toolkit. To locate here go to "Siverlight Toolkits Source\Controls.Layout.Toolkit\Themes\generic.xaml".
Here is the style and you can see the changes made to change the background of the Item Header.
<style TargetType="layoutPrimitivesToolkit:AccordionButton" x:Key="MyAccButtonStyle">
<setter Property="BorderThickness" Value="0"/>
<setter Property="Background" Value="White"/>
<setter Property="HorizontalAlignment" Value="Stretch"/>
<setter Property="VerticalAlignment" Value="Stretch"/>
<setter Property="HorizontalContentAlignment" Value="Center"/>
<setter Property="VerticalContentAlignment" Value="Center"/>
<setter Property="IsTabStop" Value="True"/>
<setter Property="TabNavigation" Value="Once"/>
<setter Property="Template">
<Setter.Value>
<controltemplate TargetType="layoutPrimitivesToolkit:AccordionButton">
<grid Margin="{TemplateBinding Padding}" Background="Transparent">
<vsm:VisualStateManager.VisualStateGroups>
<vsm:VisualStateGroup x:Name="ExpandDirectionStates">
<vsm:VisualStateGroup.Transitions>
<vsm:VisualTransition GeneratedDuration="0"/>
</vsm:VisualStateGroup.Transitions>
<vsm:VisualState x:Name="ExpandDown">
<storyboard>
<objectanimationusingkeyframes BeginTime="0" Duration="0" Storyboard.TargetName="icon" Storyboard.TargetProperty="(Grid.Column)">
<discreteobjectkeyframe KeyTime="0" Value="0"/>
</ObjectAnimationUsingKeyFrames>
<objectanimationusingkeyframes BeginTime="0" Duration="0" Storyboard.TargetName="icon" Storyboard.TargetProperty="(Grid.Row)">
<discreteobjectkeyframe KeyTime="0" Value="0"/>
</ObjectAnimationUsingKeyFrames>
<objectanimationusingkeyframes BeginTime="0" Duration="0" Storyboard.TargetName="header" Storyboard.TargetProperty="(Grid.Column)">
<discreteobjectkeyframe KeyTime="0" Value="1"/>
</ObjectAnimationUsingKeyFrames>
<objectanimationusingkeyframes BeginTime="0" Duration="0" Storyboard.TargetName="header" Storyboard.TargetProperty="(Grid.Row)">
<discreteobjectkeyframe KeyTime="0" Value="0"/>
</ObjectAnimationUsingKeyFrames>
<objectanimationusingkeyframes BeginTime="0" Duration="0" Storyboard.TargetName="cd0" Storyboard.TargetProperty="Width">
<discreteobjectkeyframe KeyTime="0" Value="Auto"/>
</ObjectAnimationUsingKeyFrames>
<objectanimationusingkeyframes BeginTime="0" Duration="0" Storyboard.TargetName="cd1" Storyboard.TargetProperty="Width">
<discreteobjectkeyframe KeyTime="0" Value="*"/>
</ObjectAnimationUsingKeyFrames>
<doubleanimation BeginTime="00:00:00" Duration="00:00:00" Storyboard.TargetName="arrow" Storyboard.TargetProperty="(UIElement.RenderTransform).(TransformGroup.Children)[2].(RotateTransform.Angle)" To="-90"/>
</Storyboard>
</vsm:VisualState>
<vsm:VisualState x:Name="ExpandUp">
<storyboard>
<objectanimationusingkeyframes BeginTime="0" Duration="0" Storyboard.TargetName="icon" Storyboard.TargetProperty="(Grid.Column)">
<discreteobjectkeyframe KeyTime="0" Value="1"/>
</ObjectAnimationUsingKeyFrames>
<objectanimationusingkeyframes BeginTime="0" Duration="0" Storyboard.TargetName="icon" Storyboard.TargetProperty="(Grid.Row)">
<discreteobjectkeyframe KeyTime="0" Value="1"/>
</ObjectAnimationUsingKeyFrames>
<objectanimationusingkeyframes BeginTime="0" Duration="0" Storyboard.TargetName="header" Storyboard.TargetProperty="(Grid.Column)">
<discreteobjectkeyframe KeyTime="0" Value="0"/>
</ObjectAnimationUsingKeyFrames>
<objectanimationusingkeyframes BeginTime="0" Duration="0" Storyboard.TargetName="header" Storyboard.TargetProperty="(Grid.Row)">
<discreteobjectkeyframe KeyTime="0" Value="1"/>
</ObjectAnimationUsingKeyFrames>
<objectanimationusingkeyframes BeginTime="0" Duration="0" Storyboard.TargetName="cd0" Storyboard.TargetProperty="Width">
<discreteobjectkeyframe KeyTime="0" Value="*"/>
</ObjectAnimationUsingKeyFrames>
<objectanimationusingkeyframes BeginTime="0" Duration="0" Storyboard.TargetName="cd1" Storyboard.TargetProperty="Width">
<discreteobjectkeyframe KeyTime="0" Value="Auto"/>
</ObjectAnimationUsingKeyFrames>
<doubleanimation BeginTime="00:00:00" Duration="00:00:00" Storyboard.TargetName="arrow" Storyboard.TargetProperty="(UIElement.RenderTransform).(TransformGroup.Children)[2].(RotateTransform.Angle)" To="90"/>
</Storyboard>
</vsm:VisualState>
<vsm:VisualState x:Name="ExpandLeft">
<storyboard>
<objectanimationusingkeyframes BeginTime="0" Duration="0" Storyboard.TargetName="icon" Storyboard.TargetProperty="(Grid.Column)">
<discreteobjectkeyframe KeyTime="0" Value="1"/>
</ObjectAnimationUsingKeyFrames>
<objectanimationusingkeyframes BeginTime="0" Duration="0" Storyboard.TargetName="icon" Storyboard.TargetProperty="(Grid.Row)">
<discreteobjectkeyframe KeyTime="0" Value="0"/>
</ObjectAnimationUsingKeyFrames>
<objectanimationusingkeyframes BeginTime="0" Duration="0" Storyboard.TargetName="header" Storyboard.TargetProperty="(Grid.Column)">
<discreteobjectkeyframe KeyTime="0" Value="1"/>
</ObjectAnimationUsingKeyFrames>
<objectanimationusingkeyframes BeginTime="0" Duration="0" Storyboard.TargetName="header" Storyboard.TargetProperty="(Grid.Row)">
<discreteobjectkeyframe KeyTime="0" Value="1"/>
</ObjectAnimationUsingKeyFrames>
<objectanimationusingkeyframes BeginTime="0" Duration="0" Storyboard.TargetName="rd0" Storyboard.TargetProperty="Height">
<discreteobjectkeyframe KeyTime="0" Value="Auto"/>
</ObjectAnimationUsingKeyFrames>
<objectanimationusingkeyframes BeginTime="0" Duration="0" Storyboard.TargetName="rd1" Storyboard.TargetProperty="Height">
<discreteobjectkeyframe KeyTime="0" Value="*"/>
</ObjectAnimationUsingKeyFrames>
<objectanimationusingkeyframes BeginTime="0" Duration="0" Storyboard.TargetName="header" Storyboard.TargetProperty="LayoutTransform">
<discreteobjectkeyframe KeyTime="0">
<DiscreteObjectKeyFrame.Value>
<transformgroup>
<rotatetransform Angle="90"/>
</TransformGroup>
</DiscreteObjectKeyFrame.Value>
</DiscreteObjectKeyFrame>
</ObjectAnimationUsingKeyFrames>
<doubleanimation BeginTime="00:00:00" Duration="00:00:00" Storyboard.TargetName="arrow" Storyboard.TargetProperty="(UIElement.RenderTransform).(TransformGroup.Children)[2].(RotateTransform.Angle)" To="0"/>
</Storyboard>
</vsm:VisualState>
<vsm:VisualState x:Name="ExpandRight">
<storyboard>
<objectanimationusingkeyframes BeginTime="0" Duration="0" Storyboard.TargetName="icon" Storyboard.TargetProperty="(Grid.Column)">
<discreteobjectkeyframe KeyTime="0" Value="0"/>
</ObjectAnimationUsingKeyFrames>
<objectanimationusingkeyframes BeginTime="0" Duration="0" Storyboard.TargetName="icon" Storyboard.TargetProperty="(Grid.Row)">
<discreteobjectkeyframe KeyTime="0" Value="1"/>
</ObjectAnimationUsingKeyFrames>
<objectanimationusingkeyframes BeginTime="0" Duration="0" Storyboard.TargetName="header" Storyboard.TargetProperty="(Grid.Column)">
<discreteobjectkeyframe KeyTime="0" Value="0"/>
</ObjectAnimationUsingKeyFrames>
<objectanimationusingkeyframes BeginTime="0" Duration="0" Storyboard.TargetName="header" Storyboard.TargetProperty="(Grid.Row)">
<discreteobjectkeyframe KeyTime="0" Value="0"/>
</ObjectAnimationUsingKeyFrames>
<objectanimationusingkeyframes BeginTime="0" Duration="0" Storyboard.TargetName="rd0" Storyboard.TargetProperty="Height">
<discreteobjectkeyframe KeyTime="0" Value="*"/>
</ObjectAnimationUsingKeyFrames>
<objectanimationusingkeyframes BeginTime="0" Duration="0" Storyboard.TargetName="rd1" Storyboard.TargetProperty="Height">
<discreteobjectkeyframe KeyTime="0" Value="Auto"/>
</ObjectAnimationUsingKeyFrames>
<objectanimationusingkeyframes BeginTime="0" Duration="0" Storyboard.TargetName="header" Storyboard.TargetProperty="LayoutTransform">
<discreteobjectkeyframe KeyTime="0">
<DiscreteObjectKeyFrame.Value>
<transformgroup>
<rotatetransform Angle="-90"/>
</TransformGroup>
</DiscreteObjectKeyFrame.Value>
</DiscreteObjectKeyFrame>
</ObjectAnimationUsingKeyFrames>
<doubleanimation BeginTime="00:00:00" Duration="00:00:00" Storyboard.TargetName="arrow" Storyboard.TargetProperty="(UIElement.RenderTransform).(TransformGroup.Children)[2].(RotateTransform.Angle)" To="180"/>
</Storyboard>
</vsm:VisualState>
</vsm:VisualStateGroup>
<vsm:VisualStateGroup x:Name="ExpansionStates">
<vsm:VisualStateGroup.Transitions>
<vsm:VisualTransition GeneratedDuration="0"/>
</vsm:VisualStateGroup.Transitions>
<vsm:VisualState x:Name="Collapsed">
<storyboard>
<doubleanimation BeginTime="00:00:00" Duration="00:00:00.3" Storyboard.TargetName="icon" Storyboard.TargetProperty="(UIElement.RenderTransform).(TransformGroup.Children)[2].(RotateTransform.Angle)" To="0"/>
</Storyboard>
</vsm:VisualState>
<vsm:VisualState x:Name="Expanded">
<storyboard>
<doubleanimation BeginTime="00:00:00" Duration="00:00:00.3" Storyboard.TargetName="icon" Storyboard.TargetProperty="(UIElement.RenderTransform).(TransformGroup.Children)[2].(RotateTransform.Angle)" To="90"/>
<coloranimationusingkeyframes BeginTime="00:00:00" Duration="00:00:00.0010000" Storyboard.TargetName="ExpandedBackground" Storyboard.TargetProperty="(Border.Background).(SolidColorBrush.Color)">
<!-- ********************* -->
<!-- Expended Item Header -->
<!-- ********************* -->
<splinecolorkeyframe KeyTime="00:00:00" Value="#1BA1E2"/>
</ColorAnimationUsingKeyFrames>
<doubleanimationusingkeyframes BeginTime="00:00:00" Duration="00:00:00.0010000" Storyboard.TargetName="ExpandedBackground" Storyboard.TargetProperty="(UIElement.Opacity)">
<splinedoublekeyframe KeyTime="00:00:00" Value="1"/>
</DoubleAnimationUsingKeyFrames>
</Storyboard>
</vsm:VisualState>
</vsm:VisualStateGroup>
<vsm:VisualStateGroup x:Name="CheckStates">
<vsm:VisualStateGroup.Transitions>
<vsm:VisualTransition GeneratedDuration="00:00:00"/>
</vsm:VisualStateGroup.Transitions>
<vsm:VisualState x:Name="Checked"/>
<vsm:VisualState x:Name="Unchecked"/>
</vsm:VisualStateGroup>
<vsm:VisualStateGroup x:Name="CommonStates">
<vsm:VisualStateGroup.Transitions>
<vsm:VisualTransition GeneratedDuration="0"/>
<vsm:VisualTransition From="MouseOver" GeneratedDuration="00:00:00.1" To="Normal"/>
<vsm:VisualTransition GeneratedDuration="00:00:00.1" To="MouseOver"/>
<vsm:VisualTransition GeneratedDuration="00:00:00.1" To="Pressed"/>
</vsm:VisualStateGroup.Transitions>
<vsm:VisualState x:Name="Normal"/>
<vsm:VisualState x:Name="MouseOver">
<storyboard>
<coloranimation BeginTime="0" Storyboard.TargetName="arrow" Storyboard.TargetProperty="(Path.Stroke).(SolidColorBrush.Color)" To="#222"/>
<coloranimationusingkeyframes BeginTime="00:00:00" Duration="00:00:00.0010000" Storyboard.TargetName="MouseOverBackground" Storyboard.TargetProperty="(Border.Background).(SolidColorBrush.Color)">
<!-- *********************** -->
<!-- Mouse Over Item Header -->
<!-- *********************** -->
<splinecolorkeyframe KeyTime="00:00:00" Value="#E51400"/>
</ColorAnimationUsingKeyFrames>
<doubleanimationusingkeyframes BeginTime="00:00:00" Duration="00:00:00.0010000" Storyboard.TargetName="MouseOverBackground" Storyboard.TargetProperty="(UIElement.Opacity)">
<splinedoublekeyframe KeyTime="00:00:00" Value="1"/>
</DoubleAnimationUsingKeyFrames>
</Storyboard>
</vsm:VisualState>
<vsm:VisualState x:Name="Pressed">
<storyboard>
<coloranimation BeginTime="0" Storyboard.TargetName="arrow" Storyboard.TargetProperty="(Path.Stroke).(SolidColorBrush.Color)" To="#FF003366"/>
<coloranimationusingkeyframes BeginTime="00:00:00" Duration="00:00:00.0010000" Storyboard.TargetName="MouseOverBackground" Storyboard.TargetProperty="(Border.Background).(SolidColorBrush.Color)">
<splinecolorkeyframe KeyTime="00:00:00" Value="Green"/>
</ColorAnimationUsingKeyFrames>
</Storyboard>
</vsm:VisualState>
<vsm:VisualState x:Name="Disabled">
<Storyboard/>
</vsm:VisualState>
</vsm:VisualStateGroup>
<vsm:VisualStateGroup x:Name="FocusStates">
<vsm:VisualState x:Name="Focused">
<storyboard>
<objectanimationusingkeyframes Duration="0" Storyboard.TargetName="FocusVisualElement" Storyboard.TargetProperty="Visibility">
<discreteobjectkeyframe KeyTime="0" Value="Visible"/>
</ObjectAnimationUsingKeyFrames>
<doubleanimationusingkeyframes BeginTime="00:00:00" Duration="00:00:00.0010000" Storyboard.TargetName="FocusVisualElement" Storyboard.TargetProperty="(UIElement.Opacity)">
<splinedoublekeyframe KeyTime="00:00:00" Value="0.385"/>
</DoubleAnimationUsingKeyFrames>
</Storyboard>
</vsm:VisualState>
<vsm:VisualState x:Name="Unfocused"/>
</vsm:VisualStateGroup>
</vsm:VisualStateManager.VisualStateGroups>
<border x:Name="background" Background="{TemplateBinding Background}" CornerRadius="1,1,1,1">
<grid>
<border Height="Auto" Margin="0,0,0,0" x:Name="ExpandedBackground" VerticalAlignment="Stretch" Opacity="0" Background="#FFBADDE9" BorderBrush="{TemplateBinding BorderBrush}" BorderThickness="{TemplateBinding BorderThickness}" CornerRadius="1,1,1,1"/>
<border Height="Auto" Margin="0,0,0,0" x:Name="MouseOverBackground" VerticalAlignment="Stretch" Opacity="0" Background="#FFBDBDBD" BorderBrush="{TemplateBinding BorderBrush}" BorderThickness="{TemplateBinding BorderThickness}" CornerRadius="1,1,1,1"/>
<grid Background="Transparent">
<Grid.ColumnDefinitions>
<columndefinition Width="Auto" x:Name="cd0"/>
<columndefinition Width="Auto" x:Name="cd1"/>
</Grid.ColumnDefinitions>
<Grid.RowDefinitions>
<rowdefinition Height="Auto" x:Name="rd0"/>
<rowdefinition Height="Auto" x:Name="rd1"/>
</Grid.RowDefinitions>
<grid Height="19" HorizontalAlignment="Center" x:Name="icon" VerticalAlignment="Center" Width="19" RenderTransformOrigin="0.5,0.5" Grid.Column="0" Grid.Row="0">
<Grid.RenderTransform>
<transformgroup>
<ScaleTransform/>
<SkewTransform/>
<rotatetransform Angle="-90"/>
<TranslateTransform/>
</TransformGroup>
</Grid.RenderTransform>
<path
Height="Auto"
HorizontalAlignment="Center"
Margin="0,0,0,0" x:Name="arrow"
VerticalAlignment="Center"
Width="Auto"
RenderTransformOrigin="0.5,0.5"
Stroke="#666"
StrokeThickness="2"
Data="M 1,1.5 L 4.5,5 L 8,1.5">
<Path.RenderTransform>
<transformgroup>
<ScaleTransform/>
<SkewTransform/>
<RotateTransform/>
<TranslateTransform/>
</TransformGroup>
</Path.RenderTransform>
</Path>
</Grid>
<layoutToolkit:LayoutTransformer
FontFamily="{TemplateBinding FontFamily}"
FontSize="{TemplateBinding FontSize}"
FontStretch="{TemplateBinding FontStretch}"
FontStyle="{TemplateBinding FontStyle}"
FontWeight="{TemplateBinding FontWeight}"
Foreground="{TemplateBinding Foreground}"
HorizontalAlignment="{TemplateBinding HorizontalContentAlignment}"
Margin="6,6,6,0"
x:Name="header"
Grid.Column="1"
Grid.Row="0"
Grid.RowSpan="1"
Content="{TemplateBinding Content}"
ContentTemplate="{TemplateBinding ContentTemplate}"/>
</Grid>
</Grid>
</Border>
<rectangle x:Name="FocusVisualElement" IsHitTestVisible="false" Visibility="Collapsed" RadiusX="1" RadiusY="1" Stroke="#FF6DBDD1" StrokeThickness="1"/>
</Grid>
</ControlTemplate>
</Setter.Value>
</Setter>
</Style>
Note that in the Visual States I changed not only the Color in the animation but also the Opacity to 1 which in the original Style is set to some lower value. Also note that you will need to import these namespaces:
xmlns:layoutPrimitivesToolkit="clr-namespace:System.Windows.Controls.Primitives;assembly=System.Windows.Controls.Layout.Toolkit"
xmlns:vsm="clr-namespace:System.Windows;assembly=System.Windows"
And than you can just easily apply the style like this:
<layoutToolkit:Accordion AccordionButtonStyle="{StaticResource MyAccButtonStyle}">
...your items here...
</layoutToolkit:Accordion>
Přihlásit se k odběru:
Příspěvky (Atom)