sobota 17. března 2012

KnockoutJS and Google Maps binding

This post describes the integration between Google Maps and KnockoutJS. Concretely you can learn how to make the maps marker part of the View and automatically change it's position any time when the ViewModel behind changes. The ViewModel obviously has to contain the latitude and longitude positions of the point that you wish to visualize on the map.

Previously I have worked a bit with Silverlight/WPF which in general leaves one mark on a person: the preference for declarative definition of the UI leveraging the rich possibilities of data binding provided by the previously mentioned platforms. In this moment I have a small free-time project where I am visualizing a collection of points on a map. This post describes how to make the marker automatically change it's position after the model values behind changes. Just like in this picture bellow, where the position changes when user changes the values of latitude and longitude in the input boxes.

image

Since I like Model-View-ViewModel pattern I was looking for a framework to use this pattern in JS, obviously KnockoutJS saved me. The application that I am working on, has to visualize several markers on Google Maps. As far as I know there is no way to define the markers declaratively. You have to use JS:

marker = new google.maps.Marker({
  map:map,
  draggable:true,
  animation: google.maps.Animation.DROP,
  position: parliament
});
google.maps.event.addListener(marker, 'click', toggleBounce);

So let's say you have a ViewModel which holds a collection of interesting points, that will be visualized on the map. You have to iterate over this collection to show all of them on the map. One possible way around would be to use the subscribe method of KO. You could subscribe for example to the latitude of the point (assuming that the latitude would be an observable) and on any change perform the JS code. There is a better way.

Defining custom binding for Google Maps.

The way to go here is to define a custom binding, which will take care of the update of the point on the map, any time, that one of the observable properties (in basic scenario: latitude and longitude) would change.

ko.bindingHandlers.map = {
init: function (element, valueAccessor, allBindingsAccessor, viewModel) {
  var position = new google.maps.LatLng(allBindingsAccessor().latitude(), allBindingsAccessor().longitude());
  var marker = new google.maps.Marker({
    map: allBindingsAccessor().map,
    position: position,
    icon: 'Icons/star.png',
    title: name
  });
  viewModel._mapMarker = marker;
},
update: function (element, valueAccessor, allBindingsAccessor, viewModel) {
  var latlng = new google.maps.LatLng(allBindingsAccessor().latitude(), allBindingsAccessor().longitude());
  viewModel._mapMarker.setPosition(latlng);
 }
}
;<div data-bind="latitude: viewModel.Lat, longitude:viewModel.Lng, map:map" ></div>

So let's describe what is going on here. We have defined a map binding. This binding is used on a div element. Actually the type of the element is not important. There are also latitude and longitude bindings, which are not defined. That is because the map binding takes care of everything. The binding has two functions: init and update, first one called only once, the second one called every time the observable value changes.

The allBindingsAccessor parameter contains a collection of all sibling bindings passed to the element in the data-bind attribute. the valueAccessor, holds just the concrete binding (in this case the map value, because we are in definition of the map binding). So from the allBindingsAccessor we can easily obtain the values that we need:

allBindingsAccessor().latitude()
allBindingsAccessor().longitude()
allBindingsAccessor().map()
Notice that the map is passed to the binding in parameter (that is concretely the google.maps.Map object, not the DOM element. Once we have these values, there is nothing easier than to add the marker to the map.

And there is one important thing to do at the end – save the marker, somewhere so we can update it’s position later. Here again KO comes with rescue, because we can use the viewModel parameter passed to the binding and we can attach the marker to the ViewModel. Here I suppose that there is no existing variable with name _mapMarker in the viewModel and JS can happily add the variable to the ViewModel.

viewModel._mapMarker = marker; 
The update method has an easy job, because the marker has been stored, and we only need to update it's position.

viewModel._mapMarker.setPosition(latlng);

Almost full example

Just check it here on JsFiddle.

Possible improvements

One thing that I do not like about this, is the fact, that you have to pass the map as an argument to the binding and the div element has to be outside of the map. Coming from Silverlight/WPF you would like to do something like this:

<div id=”map_canvas”>
<div data-bind=”latitude: vm.Lat, longitude:vm.Lng”>Whatever I want to show on the map marker</div>
</div>

That is actually the beauty of declarative UI definition. You can save a lot of code only by composing the elements in the correct order. However this is not possible – at least I was not able to get it to work. I was close however:

init: function (element, valueAccessor, allBindingsAccessor, viewModel) {
var map = element.parentNode;
var googleMap = new google.maps.Map(.map.);
//add the pointer
var contentToAddToMarker = element;
}

Again thanks to KO, here the element variable represents the DOM element to which the binding is attached. If the div element is inside the map, than we can get the parent element (which is the div for the map) and we are able to create a new map on this element. The problem which I had is the once, the new map was created, the div elements nested inside the map disappeared. Even if that would work, some mechanism would have to be introduced, in order to create the map only the first time (in case there are more markers to show on the map) and store it somewhere (probably as global JS variable).

On the other hand, thanks to the element you can get all the div which should be for example given as the description to the marker.

Summary: KnouckoutJS is great. It lets me get rid of the bordelic JS code.

neděle 11. března 2012

Collective Intelligence: Ants colony solving TSP

According to wikipedia:

Collective intelligence is a shared or group intelligence that emerges from the collaboration and competition of many individuals and appears in consensus decision making in bacteria, animals, humans and computer networks”.

This article describes, how to make the ants, find the solution for TSP problem. Implemented in Python. Get the source from GitHUb.

stable_2

The algorithms based on the collective intelligence have some “interesting” properties:

  • decentralization
  • parallelism
  • flexibility, adaptability
  • "robustness" (failures)
  • auto-organization

These algorithms are inspired by the nature. Here are some examples of collective intelligence which can be observed in the nature:

  1. The swallows settle on wires before they are taking of for the next destination. There is no leader in the group. The decision whether to take of is taken collectively. The probability for the swallow to take of is getting higher when there are more swallows in the air. If the other swallows do not join, the swallow will again settle down on the wire. At one point the number of the swallows in the air reaches the “break-point” when all the swallows decide to take of.
  2. The bees perform a special “dance” to show their peers where the foot-source is. This dance gives the information about the angle of the food source position with respect to the sun. All the bees do perform the dance when coming back in, which makes the algorithm adaptive.
  3. When the ant founds food, he lays down a "positive pheromone" on his way back. This pheromone evaporates during the time. The other ants sniff for this pheromone when choosing their route and prefer to go in places where the concentration of the pheromone is higher. The shorter the path to the food source is, more pheromone stays on the track before it evaporates. The more pheromone there is, more ants take this path. When there is a obstacle in the route – the algorithm adapts easily to knew situation. Again the shortest route to evict the obstacle is chosen in the shortest time. Some details here.

There exist several applications of collective intelligence in engineering and optimization. The ants example has applications specially in routing. One of the basic problems which can be solved using an Ant colony is Travelling Salesman Problem.

Travelling Salesman Problem

Travelling Salesman Problem is a classical problem in the field of graph theory. Given n cities the salesman has to visit all of the nodes, come back to his starting location and and minimize traveled distance. Although the problem is NP - hard, several heuristic algorithms exists which obtain suitable results in polynomial time.

Ant colony algorithm for TSP

Ant colony algorithm was introduced in year 1997 by Italian researcher Marco Dorigo.

On the beginning the ants start to explore the graph. They choose their nodes randomly, until they visit all of the nodes. A this point the ant starts to copy his path back to his starting point. While he copies the path, on each edge he lays down certain amount of pheromone inversely proportional to the length of the tour. When each ant starts new route in each node he will compute the probability to choose an edge to continue his route. The probability of choosing edge e in each step is computed as follows.

image

  • π_e  corresponds to the value of pheromone on the edge e.
  • η_e corresponds to the quality of the route. We can estimate this value by the length of the edge η_e = 1/d_e where d_e is the length of the edge.
  • J_e is a set of all the edges which the ant can use for his next step - includes all the edges except the one for which we compute the probability.
  • α and β are coefficients used to manage the impact of the length of the finished route to affect the decision other ants.
  • The amount of pheromone given to a certain edge is l = 1/routeLength^k, where k is a coefficient to amplify the impact of the length of the route to the decision.
  • During the time the pheromone evaporates on the edges. The evaporation can be expressed as: π_e = (1-ρ)π_e

The implementation in Python

Most of what I have learned and presented here was done during Collective Intelligence intensive course at Telecom ParisTech done by Jean-Luis Dessales, being part of the Athens program. The implementation was done in Python but as a module to a EvoLife program, which is a custom tool developed by Jean-Luis Dessales for scientific observations on genetic algorithms and collective intelligence algorithms. I have decided to make a stand-alone python program by taking the important bits out just for the Ants colony algorithm. I do almost never work in python, so for anyone out there if you see any big wrongdoing against the python culture, naming conventions etc, let me know.

The most important bits are in the Ant class.

self.Action = 'SearchNextNode'
self.Node
self.Path = []
self.PathLength = 0
self.ToVisit = []
self.Visited = []

The Action field remembers the Ant’s actual state. Each action has a corresponding method associated with it. The Node field holds the actual field. In ToVisit and Visited the ant stores the Nodes that he had already visited or that he needs to visit in order to achieve TSP completeness. Here is the “move” method which is called repetitively for each ant:

def moves(self):
#here is the ants move - one of the following actions is always selected
if self.Action == 'GoToNode':
self.goToNode()
if self.Action == 'SearchNextNode':
self.searchNextNode()
if self.Action == 'ReturnToStart':
self.returnToStart()
if self.Action == "GoToFirst":
self.goToFirst()

The most important of these method is searchNextNode, where the ant searches for his next edges to explore. In this method the behavior described in previous paragraph has to be defined.

def searchNextNode(self):
nodeindex = self.Node.Id        
#the maximal probability
pMax = 0
p = 0

#Try to select the best node by the pheromones in the direction
#have to iterate over all nodes
for i in range(NbNodes):
if i!=self.Node.Id and self.Visited[i]==0:
d = Land.Distances[self.Node.Id][i]

#get the value of pheromon on the edge
pi = Land.Edges[self.Node.Id][i]

#To prevent division by zero and get some info
#when d = 0 there would be problem in computation of d
if d==0:
print i
print self.Node.Id

#the quality of the route
nij = 1/d

pselected = math.pow(pi,alfa) * math.pow(nij,beta)

#normalization
#compute the sum of other options
sum = 0
for j in range(NbNodes):
if j!=self.Node.Id and self.Visited[j]==0 and j!=i:
dj = Land.Distances[self.Node.Id][j]
pij = Land.Edges[self.Node.Id][j]
nj = 1/dj
pj = math.pow(pij,alfa) * math.pow(nj,beta)
sum+=pj
if sum>0:
p = pselected/sum

#if we have a new best path - then remember the index
if p > pMax:
pMax = p
nodeindex = i

We have to iterate over all the neighbor nodes in order to choose the right one. For each node the probability of taking the edge going to this node is computed according to the formula given in previous paragraph. Some remarks: the value of the pheromone on each edge is stored in a global array:  Land.Edge[nodeFrom][nodeTo]. Also the distances between all nodes are pre-calculated in Land.Distance[nodeFrom][nodeTo].

There is quite a lot of code, regarding the visualisation. The TkInter library was used for drawing. Also the PIL library has to be installed. It should not take too long the figure out the responsibility of each class.

The results

Here is how the resulting program looks like:

image

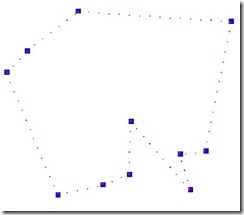
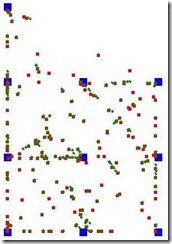
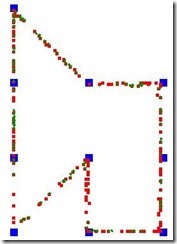
And here is the evolution of creating the final decision. First all edges have some amount of pheromone and during the time, the preferred edges are chosen. Because the ants choose the edges randomly on the beginning, the result is never assumed the same. The following three images show the evolution which resulted in quite not optimal solution.

image

image

image

The quality of the solution depends heavily on the values of the coefficients. These values can be changed in the Program.py file:

#level of pheromone to show
PToShow = 0.004
#factor which lowers the value given to a path on function of the paths length
k=1
#evaporation factor
theta = 0.07
#parameter which amplifies the value of the pheromon on the edge (pi^alfa)
alfa = 4
#parameter which amplifies the impact of the quality of the route  ni^beta; ni=1/de
beta = 2.5
Putting aside the coefficients described above, there is also PToShow value, which determines what is the minimal value of pheromone on the edge, in order for the edge to be dotted in the picture.

Before this implementation, I had one before – which was not at all efficient but quite funny. In this implementation the ants, could move freely around – there was no notion of edges. The ants simply took a directions towards a certain node and when they got close enough to it, they considered the node as reached and continued for the other one. This was useless, but I saved these funny graphics with the ants moving all around:

10_1

And the ants finding the solution:

10_2

The source code

Download it here.

As said before, the source was created as a module to a larger program and later taken out to be executable isolated. Therefor there still is quite a lot of refactoring which could be done, but I do not consider it necessary, since the purpose is merely to present the Ant colony algorithm.

čtvrtek 8. března 2012

Graph theory in Latex

For one of my previous posts, I needed some images of graphs. Initially I have taught, that I will just draw them in Inkscape or some other tool, but after a while I have decided to do something more clever – which might maybe serve me in the future – draw the graphs in Latex. After a quick search I have found this blog:

http://graphtheoryinlatex.wordpress.com/ and older posts from the same author: http://graphtheoryinlatex.blogspot.com/

This blog is about drawing graphs in TeX. So what do you need:

TikZ – a graphic system for Tex

Tkz-graph – style with basic graph drawing macros.

Tkz-berge – style with more complex drawing – such as predefined graphs (full graphs, bipartite graphs, grids etc.)

Some TeX editor. I am using Inlage. Which is not expensive and takes care for downloading all the necessary packages.

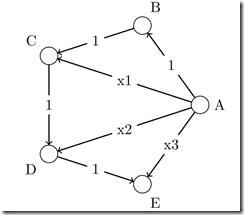
So here are the graphs and variants which I have used in the previous post:

Graph with 4 edges in a circle:

\begin{tikzpicture}
\GraphInit[vstyle=Welsh]
\SetGraphUnit{2}
\Vertices{circle}{A,B,C,D}
\Edges(A,B,C,D,A,C)
\SetVertexNoLabel
\end{tikzpicture}
image

Coloring some of the nodes:

\begin{tikzpicture}
\GraphInit[vstyle=Classic]
\SetGraphUnit{2}
\Vertices{circle}{A,B,C,D}
\Edges(A,B,C,D,A,C)
\SetVertexNoLabel
\AddVertexColor{red}{B,D}
\AddVertexColor{green}{A}
\AddVertexColor{blue}{C}
\end{tikzpicture}  


Graph with labeled edges

\begin{tikzpicture}
\GraphInit[vstyle=Welsh]
\SetGraphUnit{2}
\Vertices{circle}{A,B,C,D,E}
\SetUpEdge[style={->}]
\Edges[label=1](A,B)
\Edges[label=1](B,C)
\Edges[label=1](C,D)
\Edges[label=$1$](D,E)
\Edges[label=x1](A,C)
\Edges[label=x2](A,D)
\Edges[label=x3](A,E)
\SetVertexNoLabel
\end{tikzpicture}

Graph with positioned vertices.

Using the EA, NOEA and similar macros (EA = East of first vertex define the second vertex, NOEA = Northeast of…)

\begin{tikzpicture}
\SetGraphUnit{2}
\GraphInit[vstyle=Normal]
\Vertex{S}
\NOEA(S){A} \SOEA(S){B}
\EA(A){T1} \EA(B){T2}
\SOEA(T1){F}
\Edges[label=1](S,A)
\Edges[label=1](S,B)
\Edges[label=4](A,T1)
\Edges[label=2](B,T2)
\Edges[label=1](T1,F)
\Edges[label=1](T2,F)
\Edges[style={pos=.25},label=3](A,T2)
\Edges[style={pos=.25},label=2](B,T1)
%Could use this for bending%
\tikzset{EdgeStyle/.append style = {bend left}}
\end{tikzpicture}

Bipartite graph using the berge styles:

\begin{tikzpicture}
\grCompleteBipartite[RA=4,RB=3,RS=6]{2}{2}
\end{tikzpicture}

image

For now I am content that I have found this blog and actually I have to say, that drawing graphs in TeX is much easier than I have expected.

neděle 4. března 2012

Wrong SystemRoot variable causes 0xC0150004

Last week I had experienced this quite "funny" situation on WinXP machine.

When I have run some post-build scripts using Jenkings & Maven I have obtained something like:

CMD is not known, not an executable file etc...

I took a look at it and I taught to myself - the "SystemRoot" variable is not set! I have to correct this and it will work fine. Actually this is not true, but apparently it Jenkins does some cleaning in the variables, so it might happend, that the scripts runned by Jenkins will not work as you have expected. Anyway that is not the point of my story. So what I did to "correct" the error was to add the following variable to my USER environement variables:

SystemRoot = SystemRoot\System32

I was too quick and too naive. First the SystemRoot had been already defined in the System variables and second the correct path is just C:\Windows. So I have used this recursion to define the varible - in wrong path.

When I have saved my master work, I could not execute almost any new program. I have always obtained the following error:

0xC0150004

So after a fast google I have found out, that this error appears when the SystemRoot variable is not correctly set. Cool so how to fix the mistake? You cannot launch any program or system utility at all and you need to correct the environement variable.

Well after a wail I have found this solution:
  • Login as another user
  • Start the CMD as the user with the wrong environement variable
  • Correct the variable using: SET SystemRoot=C:\Windows
  • Now you think it is ok, but after a restart you will find out, that the new settings is never taken into account. So do not bother to restart and try the following:
  • Run REGEDIT from the CMD which is opened using the account and where ther correct SystemRoot was set. Notice it will run....and before it was failing because regedit is dependent on that SystemRoot variable.
  • Find the user variables searching here: HKEY_CURRENT_USER\Environment
  • Now correct the SystemRoot variable and voila after restart you can log in again with the "infected account"


The moral of the story:


Lot of applications (notepad, regedit, explorer, task manager) would not start if the SystemRoot is not set correctly.

WinXP will let you set the variable to such a nonsence as:
SystemRoot = SystemRoot\System32